Turn pixel distances into physical measurements
A digital image records width and height in pixels. Calibration supplies the missing conversion between those pixels and a physical unit such as nm, µm or mm. NotyCalibration calculates that conversion from a line whose real length is known: real length ÷ measured pixel length = physical distance per pixel. Once the result is attached to the correct image, compatible NotyLab tools can use the same scale instead of asking you to enter it again.
Calibration does not improve image resolution or prove that a microscope setting is correct. It records a traceable scale relationship, so the quality of every downstream measurement still depends on the reference, acquisition settings and endpoint placement.
Who NotyCalibration is for
- SEM, TEM and optical microscopy researchers converting image features from pixels to physical units
- Laboratory teams that want one verified calibration to follow an image into measurement and figure-preparation tools
- Students and analysts who need to inspect the pixel length, real distance, unit and resulting distance-per-pixel value before measuring
Start from embedded scale information or a reference image
First decide where the trustworthy scale comes from. If an image already has calibration attached in its NotyLab library record, open that image and verify the attached name, unit and distance-per-pixel value before reusing it. This embedded information is structured calibration data associated with the image record; it is not the visible scale bar and should not be assumed to be EXIF or text burned into the pixels.
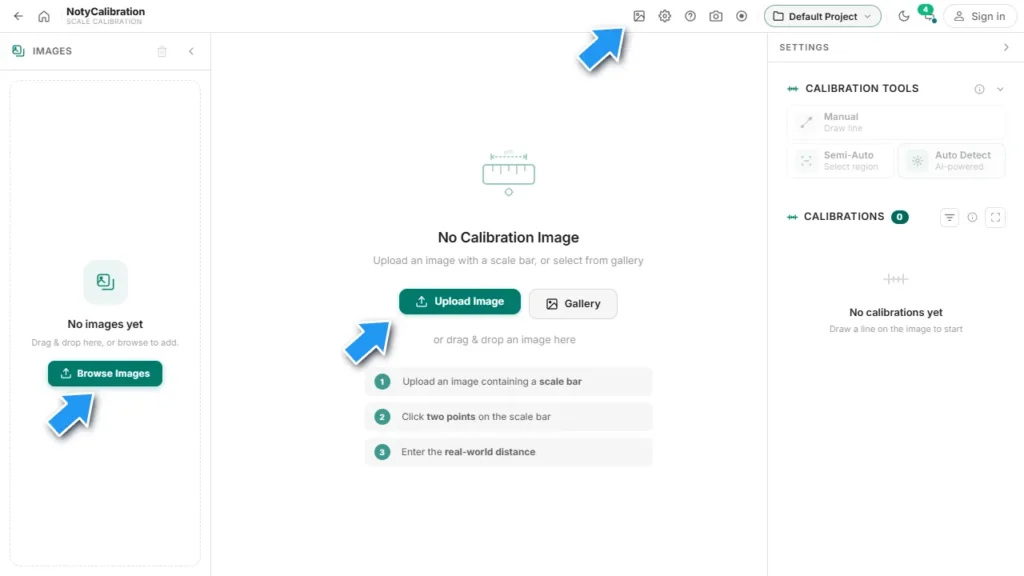
If the target image has no attached calibration, use a visible scale bar or another known distance. When the reference is in a separate image, keep the target in the first tab and add the gauge or reference as a reference tab. The reference must represent the same magnification, pixel sampling and acquisition conditions as the target. The saved result is ultimately attached to the target image, not treated as a universal instrument calibration.
- Load the target by upload, drag and drop, webcam capture or the NotyLab library.
- Use Add reference image when the known scale is stored in a separate gauge or companion capture.
- Choose Manual for two explicit endpoints, Semi-Auto for a selected scale-bar region, or Auto Detect when AI access is available.
- Use zoom, the magnifier and edge snap to check the exact pixels used by the reference line.
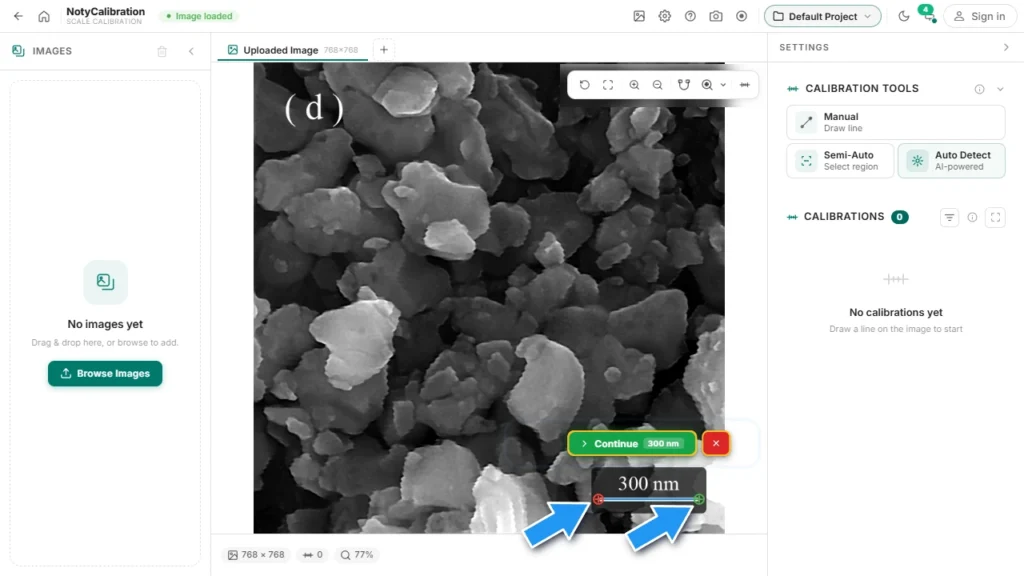
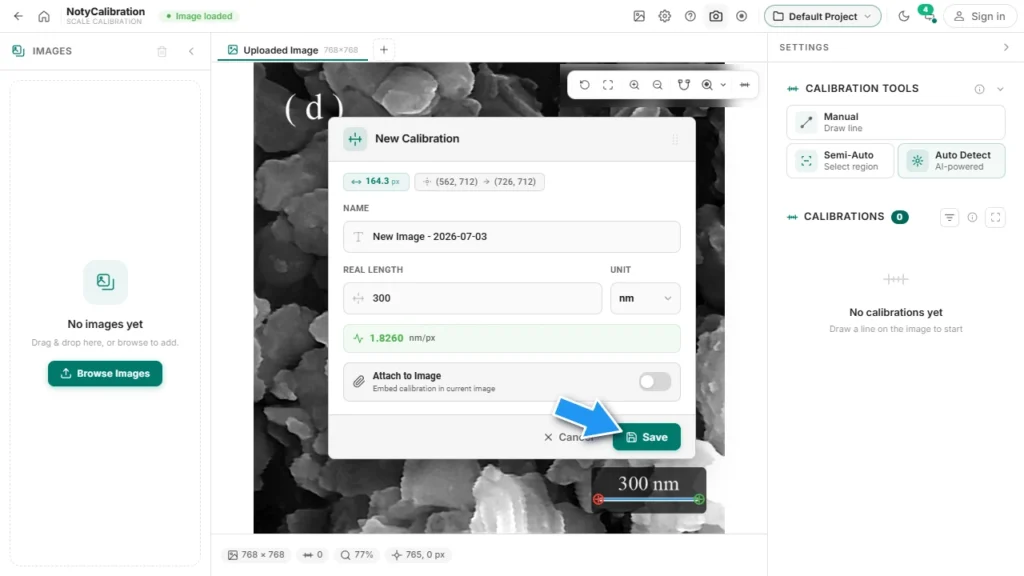
A real calibration example: 300 nm across 164.3 pixels
In the example workspace, the reference line spans 164.3 px and the printed scale-bar value is 300 nm. NotyCalibration therefore calculates 300 nm ÷ 164.3 px = 1.8260 nm/px. With that calibration, a feature measuring 50 px corresponds to about 91.3 nm.
Place both endpoints on the same two edges that define the printed 300 nm bar. Do not measure the label, the surrounding dark box or a nearby particle. If the line is even a few pixels too long or short, that proportional error is carried into every converted distance.
Review the scale before saving
The New Calibration dialog keeps the evidence and result together. Confirm the measured pixel length, give the calibration a meaningful name, enter the known real length, and select the exact unit shown by the source. The live result in nm/px, µm/px or another selected unit should agree with your expectation before you save.
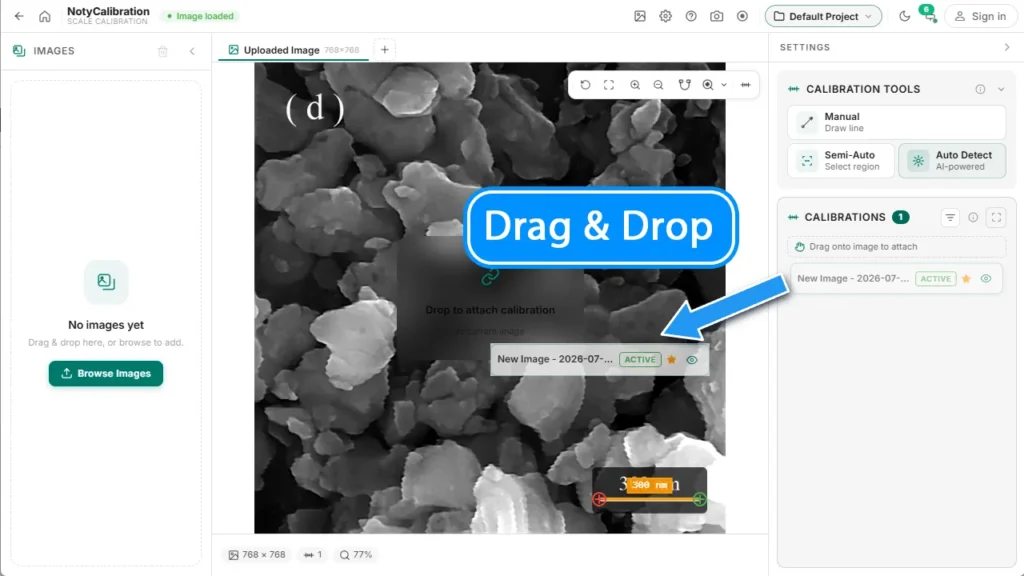
Enable Attach to Image when this result should travel with the current target image. Saving creates a reusable calibration entry; attaching links its scale data to the image record used by downstream tools. These are related but distinct actions, so verify the attached status after closing the dialog.
A short calibration workflow
- Load the target image and check whether its NotyLab record already contains a valid attached calibration.
- If calibration is still needed, identify a known distance in the target or add a separate reference image captured under matching conditions.
- Choose Manual, Semi-Auto or Auto Detect. Draw the two endpoints or select the reference region, then inspect the result at a useful zoom.
- Confirm the pixel span. Enter the real distance and its unit exactly as documented by the scale bar, stage micrometer or acquisition record.
- Name and save the calibration, attach it to the target image, and verify the active or attached indicator.
- Continue to NotyMeasure, NotyGrid or NotyScale and confirm that the expected physical unit and scale are available before collecting results.
Attach once, then verify it in downstream tools
An attached calibration appears with the image context and can be reused by compatible workspaces. NotyMeasure can convert drawn feature lengths into physical distances, NotyGrid can keep calibrated images consistent in multi-image layouts, and NotyScale can generate a scale bar whose displayed length is tied to the image scale.
Attachment prevents repeated transcription, but it does not remove the need for review. When opening the image in another tool, check the calibration name, unit and a known feature before relying on exported values or figures.
Common calibration errors and how to avoid them
- Buttons are disabled: load an image first, or save or cancel the unfinished calibration before starting another mode.
- Pixel length is wrong: zoom in, enable the magnifier, turn on edge snap when helpful, and place both endpoints on the actual reference edges.
- Result is off by a factor of 1,000: recheck whether the source label is nm, µm or mm and select that same unit in the dialog.
- A separate reference gives inconsistent results: confirm that it was acquired with the same magnification, resolution, binning and image transformation as the target.
- The calibration is missing in another tool: make sure it was attached, not only saved, and that the target image exists in the NotyLab library when persistent reuse is required.
- Auto Detect is unavailable or returns a doubtful line: connect the local engine or check AI access, then verify the detected endpoints visually or use Manual mode.
What the saved output contains
The result is a named calibration containing the measured pixel span, known real distance, unit and calculated distance per pixel. It can be listed, previewed, edited, attached to or detached from the current image. When attached, the scale information is stored with the NotyLab image record for compatible measurement and scale-bar workflows; it does not add a visible scale bar to the image.
Limitations
- Calibration accuracy cannot exceed the accuracy of the known reference, the original acquisition or your endpoint placement.
- A calibration is image- and acquisition-specific. Do not transfer it across magnifications, camera modes, binning settings, non-proportional resizing or resampling without independent verification.
- A separate reference image is valid only when its imaging conditions match the target; a convenient reference from another session may produce a precise-looking but incorrect scale.
- Perspective, lens distortion or a non-planar specimen can make one global distance-per-pixel value inaccurate in other parts of the image.
- Auto Detect requires an available local engine or eligible AI access and credits, and every detected reference still needs visual confirmation.
- Attaching calibration stores scale data in the NotyLab image record; it does not rewrite microscope metadata, certify the instrument or burn a scale bar into the image pixels.
Before you continue to measurement
- The reference value and unit match the original scale label or acquisition record.
- The endpoints span the intended known distance and the calculated distance per pixel is plausible.
- The calibration is attached to the target image rather than only saved in the calibration list.
- The image has not been resampled or transformed since the scale was established.
- A known feature produces the expected physical measurement in the next tool.