Before You Start
Before configuring NotyGrid Scale Bars, make sure that:
- At least one image is added to the NotyGrid workspace.
- The image has an attached calibration or a default calibration exists.
- You understand whether the scale bar should be applied globally or per image.
- Your image grid layout is already close to its final structure.
Scale bars may not appear if the selected image has no calibration. This is expected behavior because NotyGrid needs calibration data to calculate the correct visual length.
Feature Overview
The Scale Bars panel controls how scale bars appear inside the image grid. It is mainly used to keep measurement markers consistent across multi-panel scientific figures.
You can use it to manage:
- Scale bar preset style
- Anchor position
- Horizontal and vertical margins
- Image-level Add, Edit, and Remove actions
- Display Length
- Auto Setup Scale Bar
NotyGrid can show scale bars saved on each image and can also apply a global preset style without changing the original image data. This is useful when you want a consistent figure style while keeping image-level calibration intact.
Configure Scale Bars from Settings
Use the global Scale Bars section when you want consistent placement and styling across the whole grid.
Steps
- Open the Settings tab.
- Find the Scale Bars section.
- Expand the panel.
- Review the available controls.
- Adjust preset, anchor position, and margins as needed.
Expected Behavior
When the panel is expanded, NotyGrid shows the available scale bar controls. When collapsed, the controls are hidden to keep the workspace cleaner.
Changes should be reflected in the grid preview, so you can check scale bar placement before export.
Common Mistake
Do not configure scale bars before calibration. If the image is not calibrated, NotyGrid cannot calculate an accurate measurement marker.
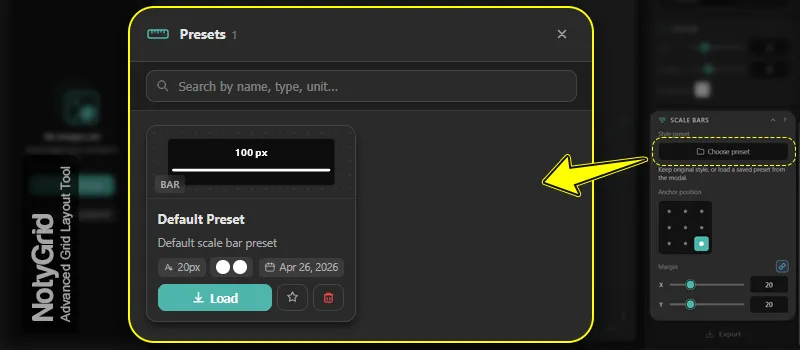
Apply a Scale Bar Preset
Scale bar presets let you reuse saved styles across images and figures. This is useful when your lab, paper, or project requires a consistent scale bar appearance.
Steps
- Open Scale Bars.
- Click Choose preset.
- Select a preset from the modal.
- Apply the preset.
- Use Keep original if you want to remove the override and return to the image’s original scale bar style.
Expected Behavior
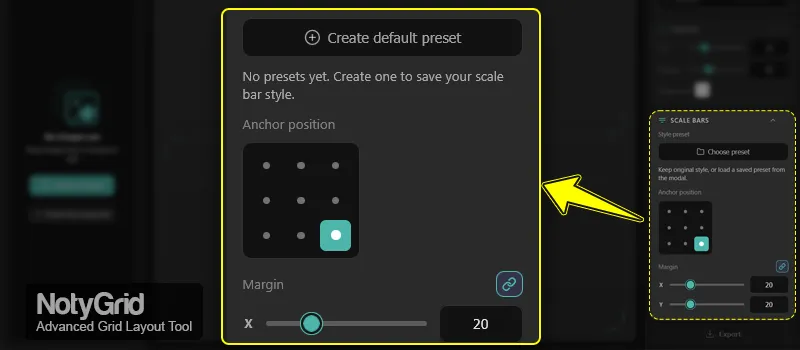
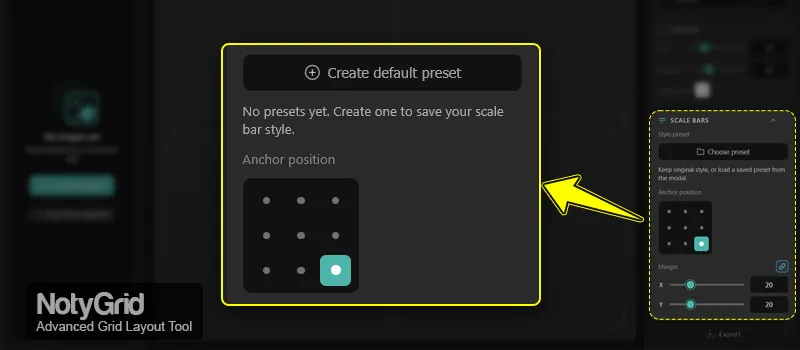
If no presets exist, NotyGrid may show Create default preset.
If a preset is active, the selected preset appears as a badge and the button changes to Change preset.
The preset modal replaces the old dropdown behavior and makes preset selection clearer for documentation-style workflows.
Recommended Use
Use presets when you want all scale bars in a figure to have the same visual style, such as the same color, font, line weight, or background style.
Set the Anchor Position
The Anchor position controls where the scale bar appears inside each image panel.
NotyGrid uses a 9-point anchor grid:
- Top left
- Top center
- Top right
- Middle left
- Center
- Middle right
- Bottom left
- Bottom center
- Bottom right
Steps
- Open Scale Bars.
- Find Anchor position.
- Select one point in the anchor grid.
- Check the preview.
- Adjust margins if the scale bar is too close to the image edge.
Expected Behavior
Only one anchor position can be active at a time. The selected point defines the general placement of the scale bar inside the panel.
Recommended Value
For most microscopy figures, bottom left or bottom right works best because it usually avoids important central image content.
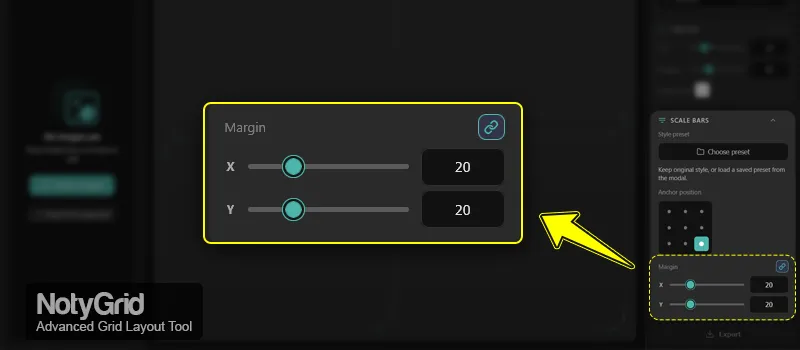
Adjust Scale Bar Margins
Margins control the distance between the scale bar and the image edge.
Use X margin for horizontal spacing and Y margin for vertical spacing.
Steps
- Open Scale Bars.
- Go to Margin controls.
- Adjust X to move the scale bar horizontally from the edge.
- Adjust Y to move the scale bar vertically from the edge.
- Enable the link option if you want X and Y margins to stay synchronized.
Expected Behavior
Margin changes affect the scale bar position relative to the selected anchor. If the link option is enabled, changing one margin updates the other value too.
Recommended Values
| Use Case | Recommended Margin |
|---|---|
| Small image panels | 8–16 px |
| Standard grid panels | 16–28 px |
| Large export figures | 24–40 px |
| Dense microscopy images | Increase margin until the scale bar is readable |
Limit
The current margin range is 0–80 px with a step of 2 px.
Use Image-Level Scale Bar Controls
Use image-level controls when each image needs its own scale bar behavior. This is common when images have different magnifications or different calibration profiles.
Steps
- Select an image in the grid.
- Open the Image tab.
- Find the Scale Bar card.
- Use Add, Edit, or Remove.
Expected Behavior
The Scale Bar card appears only when the selected image supports scale bar actions. If calibration is missing, some actions may be hidden or disabled.
When to Use This
Use image-level controls when:
- Each image has a different magnification.
- Only some panels need scale bars.
- You need to remove a scale bar from one image.
- You want to edit one image without changing the whole grid.
Adjust Display Length
Display Length changes the measurement value shown on the scale bar. It helps you choose a readable and meaningful value without recalibrating the image.
Steps
- Select an image.
- Open the Image tab.
- Find Display Length.
- Use the stepper or input field.
- Check the scale bar label and visual length.
Expected Behavior
NotyGrid updates the scale bar based on the selected display length and the image calibration.
Recommended Values
Choose clean, readable values such as:
- 100 nm
- 500 nm
- 1 µm
- 5 µm
- 10 µm
- 50 µm
- 100 µm
Avoid irregular values unless they are required for your experiment or publication.
Use Auto Setup Scale Bar
Auto Setup Scale Bar creates a scale bar automatically when NotyGrid can use an available default calibration.
Steps
- Select an image.
- Make sure a default calibration exists.
- Open the image-level Scale Bar controls.
- Click Auto Setup Scale Bar.
- Review the generated scale bar.
Expected Behavior
Auto Setup appears only when NotyGrid can create a valid scale bar from the available calibration data.
If the image already has a scale bar, the Auto Setup option may not appear.
Best Use Case
Use Auto Setup when preparing multiple images quickly and then refine the final position, preset, and display length before export.
Expected Behavior Summary
| Condition | Expected Result |
|---|---|
| Scale Bars panel is collapsed | Controls are hidden |
| Scale Bars panel is expanded | Controls are visible |
| No preset exists | Create default preset may appear |
| Preset is active | Preset badge and Change preset are shown |
| Link margin is enabled | X and Y margins update together |
| Image has calibration | Add Scale Bar becomes available |
| Default calibration exists | Auto Setup Scale Bar may appear |
| Image has no calibration | Scale bar actions may be hidden or disabled |
Troubleshooting
Scale bar does not appear
Check whether the selected image has calibration. Scale bars require calibration to calculate real measurement length.
Add Scale Bar is disabled or missing
This usually means the image does not have an attached calibration. Attach a calibration first or set a default calibration profile.
Auto Setup Scale Bar is not visible
Auto Setup appears only when a default calibration exists and the selected image does not already have a scale bar.
Scale bar appears in the wrong position
Check Anchor position first. Then adjust X margin and Y margin.
Scale bar overlaps important image content
Move the anchor to another corner or increase the margins. For dense images, avoid placing the scale bar near key structures.
Scale bar style is inconsistent across panels
Apply a shared scale bar preset from the Choose preset modal.
Display Length looks unusual
Use rounded values such as 1 µm, 5 µm, 10 µm, or 100 µm when possible. Irregular values can make the figure harder to read.
Recommended Settings for Publication-Ready Figures
| Setting | Recommendation |
|---|---|
| Anchor position | Bottom left or bottom right |
| Margin X/Y | 16–32 px |
| Preset | Use one shared preset across the figure |
| Display Length | Use clean rounded values |
| Calibration | Verify before export |
| Export check | Review scale bar readability at final output size |
Related Settings
These NotyGrid settings are commonly used with NotyGrid Scale Bars:
- Calibration Manager: required for accurate scale calculation.
- Image tab: used for image-level scale bar actions.
- Layout settings: controls rows, columns, spacing, and panel size.
- Labels: helps combine panel labels with scale bars cleanly.
- Export settings: controls final output size, DPI, and file format.
Related Documentation
- NotyGrid Layout Settings: Image Grid Configuration Guide
- How to Customize NotyGrid Labels
- NotyGrid Export Settings
- Calibration Manager Documentation
- Scale Bar Drawer Documentation